New Feature in Photoshop CS6 – Adaptive Wide Angle Filter
This tutorial will show you how to use another new feature in Photoshop CS6 – Adaptive wide angle filter.
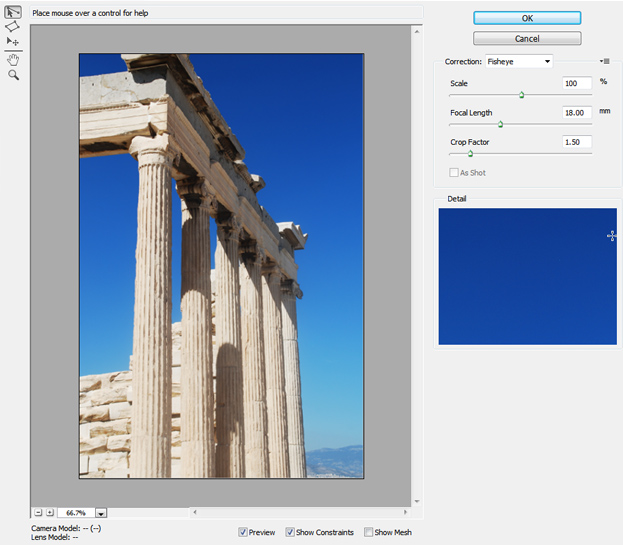
01. When shooting pictures with a wide angle lens, the picture will have some distortion. Same applies when shooting large monuments, sights or buildings – some columns or walls can end up a bit crooked. Photoshop CS6 comes to rescue with a new Adaptive Wide angle filter. Just open a picture you’d want to fix. We opened an image where some large columns are. Unfortunately the columns are not very straight and we’d like to fix that.
02. Adaptive wide angle filter can be located from the Filter menu.
03. Clicking it, a new window will open. There you have the sliders and a drop down menu to change things fast, but they are not very accurate and it’s best to adjust everything manually.
04. For that, just choose a thing you’d wish to adjust 1st and then one click on its starting point and second click on its ending point. Like that you create a line that has some dots on it and a circle which allows you to turn the part a bit. Of course changing one object will adjust the parts next to it also.
05. Make another line to another part of the picture to make them perfectly aligned. Just 2 clicks – one at the starting point, other at the ending point and then move or turn the line by dragging the little dots on it. Ctrl + Z to undo, Alt click on the line to delete it.
06. Try to adjust not only the vertical parts but also the horizontal parts – straighten the horizon, rooftop, tree etc. Press OK when you are done with the adjustments.
07. Like this you can straighten anything and give things new angles and perspectives that will make your pictures look better than ever!


